Tracking website data is essential to understand how users interact with the content, how they behave, and what interests them. This information is crucial for website optimization and informed decision-making in your business. Google Analytics is a popular and effective tool for tracking website data, and the new version, Google Analytics 4, offers many advanced features for data analysis and measurement. In this article, we will show you how to set up Google Analytics 4 so that you can start collecting useful data for your website.
Step 1: Create a Google Analytics account and property
Before starting the Google Analytics 4 setup, you must create a Google Analytics account and a property for your website. A Google Analytics account is required to access all properties and reporting views, while the property represents the specific website you will measure. To create an account, follow these steps:
- Open the Google Analytics page and sign in with your Google account.
- Click on “Create Account” and follow the instructions to set up a new Google Analytics account.
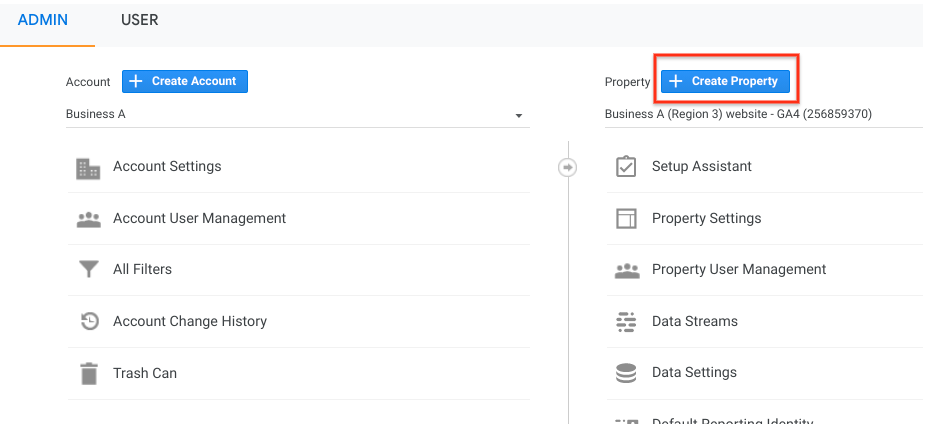
- Once the account is created, click on “Create Property.”
- Enter the property name and the URL of the website you want to track.
- Select the time zone and currency for the property.
- Click “Create” to generate the property.
- After creating the property, you should create a reporting view to visualize your website data.
Step 2: Setting up Google Analytics 4
Once the property has been created, it’s time to configure Google Analytics 4. Here are the steps to set up the tracking tool:
- Log in to your Google Analytics account.
- On the main page, select the account where you want to add the property.
- In the left column, click “Properties.”
- Click the “Create Property” button in the upper right corner.
- Give the property a name, select the time zone and report currency. Note that Analytics will automatically adjust for daylight savings if applicable.
- Select the business size and industry category.
- Select how you intend to use Google Analytics. The default reports will adjust to the information provided.
- Click “Create” and accept the Analytics Terms of Service and Data Processing Agreement.
Install the Google Analytics tag on your website
The tag is a snippet of code that must be placed on your website to allow data collection. To install it, follow these steps:
- Click “Installation” at the top of the screen.
- Select the property and container you just created.
- Follow the instructions to install the tag on your site. The tag must be present on all pages to track data correctly.
Set up custom events
Custom events are specific actions users take on your site that can be measured. These events can be customized to track actions not predefined in Google Analytics. To configure custom events, you must do it from Google Tag Manager using the following steps:
- Click on Tags > New.
- Select Google Analytics: GA4 Event in Tag Configuration.
- Select the GA4 Configuration tag under Configuration Tag.
- Enter a custom event name in Event Name.
- Add event parameters in Event Parameters.
- Choose the right trigger in the Trigger section.
- Save and publish the tag (e.g., GA4 Event – Click – Add to Cart).
Set up conversions
Conversions represent key actions you want users to complete, such as submitting a form or viewing a specific page. To configure them:
- Click on “Conversions.”
- Select the property and container.
- Define the conversions you want to track.
- Add the details, such as the URL or form name.
Set up audiences
Audiences are groups of users who share common characteristics. To set them up:
- Click “Audiences.”
- Select the property.
- Create the desired audience type (e.g., remarketing audience).
- Add user attributes such as age, interests, or location.
Step 3: Advanced configuration
Google Analytics 4 also allows integrations with external platforms to improve tracking and analysis:
Google Ads Integration
This allows you to track conversions and ad performance. To connect:
- Click “Admin.”
- Select the property and click “Google Ads Linking.”
- Follow the instructions.
Google Optimize Integration
Allows A/B testing and content personalization:
- Click “Admin.”
- Select the property and click “Google Optimize Linking.”
- Follow the instructions.
BigQuery Integration
- Click “Admin.”
- Select the property and click “BigQuery Linking.”
- Follow the instructions.
Firebase Integration
- Click “Admin.”
- Select the property and click “Firebase Linking.”
- Follow the instructions.
Step 4: Analyzing data
Data reports
View performance metrics such as users, pageviews, and conversions from the “Reports” section.
Custom Dashboards
Create dashboards to see key data at a glance.
Explorations
Use Explorations to analyze user behavior patterns.
Step 5: Tips to maximize GA4 usage
- Use custom event tracking.
- Set measurable conversion goals.
- Create dashboards for quick insights.
- Use Explorations to detect user trends.
- Run validation tests to ensure data accuracy.
Configuring Google Analytics 4 is essential for tracking website data and making informed business decisions. By following this guide, you can start collecting valuable data today and optimize your website more effectively. Start setting up Google Analytics 4 now and use insights to grow your business!